How Tile Installation San Antonio can Save You Time, Stress, and Money.
Wiki Article
The Only Guide to Tile Installation San Antonio
Table of ContentsFascination About Tile Installation San Antonio8 Simple Techniques For Tile Installation San AntonioThe Facts About Tile Installation San Antonio UncoveredThe Facts About Tile Installation San Antonio RevealedNot known Factual Statements About Tile Installation San Antonio Top Guidelines Of Tile Installation San Antonio
Utilize this very same method to establish each tile, making one row along the straightedge. Using tile spacers makes certain also joints.For straight cuts with waste less than an inch wide, rating tile on snap cutter, after that break pieces off with nibblers or use a damp saw. To fit a floor tile around an outdoors corner, hold one edge versus the wall surface and also mark the ceramic tile where it touches the edge. Pencil a line right across the tile.
For curved or scribed cuts, make parallel pieces with the damp saw into the waste section, up to yet not past the line noting the cut. Damage away the remaining "fingers" with nibblers. After tile collections over night, utilize a margin trowel to scrape off any thinset from the floor tile surface or in the joints.
Not known Details About Tile Installation San Antonio
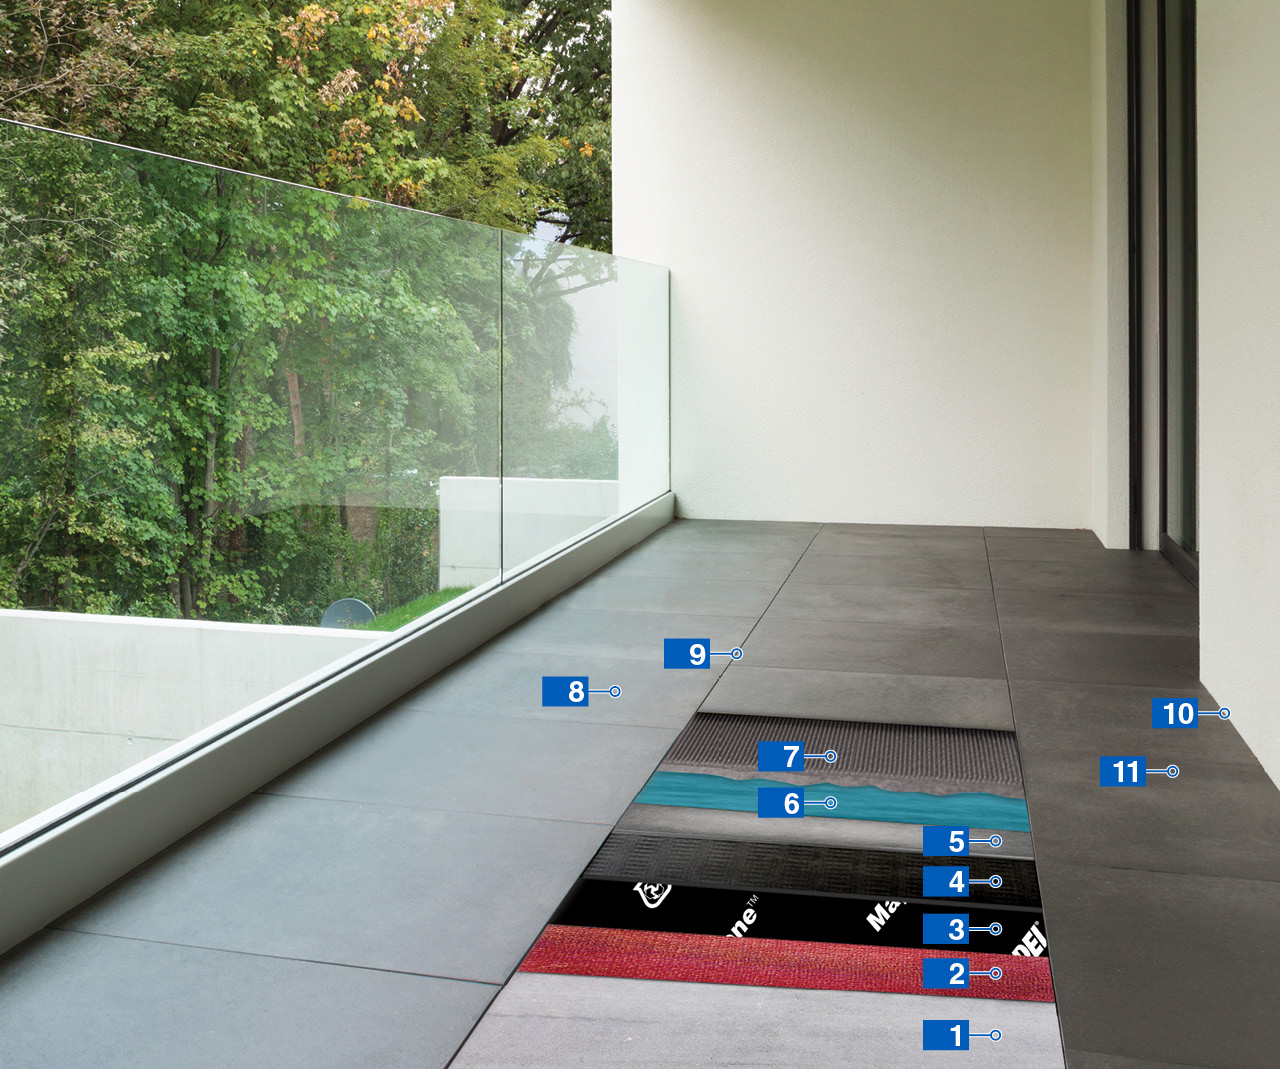
Installing a ceramic tile floor might appear to be past the abilities of some home owners, but many DIYers can handle it. Set up ceramic floor tile over a subfloor that's no much less than 1 1/8 inches thick.
A flexing subfloor lead to cracked tiles as well as grout as well as a great deal of migraines. The majority of floor tile manufacturers recommend setting up a cement backer board rather than any various other sort of underlayment, such as plywood. The boards can be found in 3-by-5-foot sheets and are available where ceramic tile as well as grout are sold. After you develop your standards or design lines, it's time to set up the ceramic tile: Prior to you think of setting the tile in position with mortar, ensure that the design is even from side to side in both directions.
Fascination About Tile Installation San Antonio
One important dimension to note is the width of the tiles that meet the wall surface. See to it you never ever have less than half of a floor tile's width at the wall surface. If you do, readjust the format up until you get an ample end ceramic tile dimension. After you establish this, snap a new design line to adhere to.Make use of a notched trowel to spread out thin-set mortar over a 3-by-3-foot section at the intersection of the next page layout lines - tile installation san antonio. Trowels come with different-sized notches, so inspect the ceramic tile manufacturer's referral for the correct size. Operating in little, square areas claim 3 feet by 3 feet is very important. If you deal with a bigger area, the mortar may solidify (called establishing up) before you put the tiles in position.
Start laying floor tiles at the facility point of the 2 design lines, setting each floor tile right into the mortar by tapping it gently with a rubber mallet. Use plastic spacers at each tile edge to keep also grout lines in between the ceramic tiles.
The Ultimate Guide To Tile Installation San Antonio
Mark the loosened tile and reduce it to fit along the edge. The ceramic tiles are established in the mortar, mix the cement according to see this page the maker's instructions as well as install it by making use of a rubber grout float. Utilize a sweeping activity, pressing the cement into the spaces. Clean away the excess grout with a cement sponge.
For a lot of setups, you need a tile cutter, which you can rent out. To make a straight cut with look at this site a floor tile cutter, just put the floor tile face up in the cutter, readjust the cutter to the proper width, as well as rack up the ceramic tile by drawing the cutting wheel across the floor tile's face.
Top Guidelines Of Tile Installation San Antonio
A tile nipper resembles a pair of pliers, yet it has actually hardened reducing edges for cutting with ceramic tile.There are two various vinyl floor tile installation approaches. Most products feature a peel-and-stick installment, where you simply remove the lining sheet from the back of the ceramic tile as well as stick the ceramic tile to the floor. We do use pick items that require a full-spread adhesive installation. Vinyl floor tile installation can be done anywhere in your house, as long as it's a level, degree surface, but we do not advise setting up on stairways.
These specialists are specifically educated to install our items, so you can feel confident that your new flooring will certainly not just look terrific, but will certainly be mounted properly with guaranteed results. Meticulously review the in-depth directions for your floor covering to learn what you'll require as well as what to anticipate. Do this well in development.
The Definitive Guide for Tile Installation San Antonio
roller, among various other products. Inspect your installation directions for specifics. Adjustment provides the floor covering time to adapt to the setting of the area where it will be installed. Bring the setup location and also products to room temperature level for two days before setup. Relying on the item you have actually picked, instructions may vary.
Report this wiki page